
Key takeaways
- Trial-fill bottles with the actual product to check capacity, filling performance, and dispensing.
- Test the bottle, cap, seal liner, and label together before approving the finished sample.
- Request quotes against the same approved specification so you can compare costs and minimum order quantities.
Choosing a supplement bottle means checking more than its appearance or listed capacity. The bottle must hold the intended quantity, protect the product, run reliably through filling, sealing, and labeling, and remain practical for customers to open, dispense from, and reclose.
A bottle that works during a bench trial may behave differently on a production line. Capsules may fit inside the container but jam at the shoulder during continuous filling. A cap that tightens easily by hand may have a different opening torque after sealing and shipping. A label that looks smooth on one sample may wrinkle or overlap when bottle dimensions vary within production tolerances.
Test these conditions with the actual product and the packaging components you intend to use in production. Evaluate the bottle, cap, seal liner, label, and any desiccant or scoop as one packaging system rather than approving each component separately.
A supplement bottle packaging specification gives the supplier a list of components to deliver, the filling facility the conditions to run, and the quality team the criteria for approving samples and finished packs. It should identify component part numbers, drawing revisions, dimensional tolerances, material requirements, and agreed inspection methods.
For products sold in the United States, packaging selection also connects to dietary supplement manufacturing requirements. Packaging that contacts the supplement must be safe and suitable for its intended use and must not adversely affect product safety or quality. Written packaging and label specifications are therefore more useful than a supplier’s general statement that a bottle is suitable for supplements.
Product and Production Requirements
Before comparing bottle styles, define what the package must contain and how it will be processed. This prevents you from selecting an attractive bottle that later requires a different filling chute, a larger carton, or an unplanned change to the closure.
When requesting samples, provide the actual product, the target fill per bottle, any items packed inside the bottle, and the capabilities of the existing line.
Include the following information:
- For capsules, specify the length and maximum diameter, along with the capsule count per bottle.
- For tablets, provide the maximum width and thickness, shape, and target count.
- For powders, provide the target net weight and loose-fill volume. Explain how the loose-fill volume was measured so different suppliers can interpret it consistently.
- For a desiccant or scoop, give its dimensions and state whether it will be inserted before or after filling.
- For the production line, identify the filling method, planned operating speed, capping equipment, induction sealer, and labeling equipment.
- For distribution, explain whether bottles will travel in bulk cartons, retail cartons, or individual e-commerce parcels.
Send a physical product sample with the specification when available. Actual capsules, tablets, and powders allow the filling facility to assess handling behavior that a dimensional drawing alone cannot demonstrate.
| Area | What to verify | Who should verify it |
| Bottle dimensions | Height, maximum outside diameter, base shape, and dimensional tolerances. Check fit with conveyor guides, bottle grippers, and the labeling station. | Filling facility |
| Neck and cap | Minimum neck inside diameter, thread finish, sealing surface, and matching cap part number. Ask whether the supplier has trial-fitted this combination. | Packaging supplier and filling facility |
| Seal liner | Part number, compatible bottle materials, peel characteristics, backing retained after peeling, and whether the cap ships with the liner installed. | Packaging supplier |
| Label and carton | Usable label panel dimensions, overall capped bottle height, bottle count per carton, and packing configuration. | Label supplier and filling facility |
| Product protection | Product-specific moisture and light protection requirements, available barrier data, and the proposed stability-testing package. | Product development and quality team |
| Production setup | Required change parts, equipment adjustments, operating speed, and inspection points. | Filling facility |
| Documentation | Component drawings, material specifications, lot identification, and approval records. | Packaging supplier and quality team |
Assign responsibility for each approval before ordering production quantities. For example, the packaging supplier can confirm component dimensions, but the filling facility must confirm whether those components work on its equipment.
HDPE PET and Glass Supplement Bottles
Compare HDPE, PET, and glass supplement bottles at the same fill quantity and with the intended closure. Comparing empty bottles alone can hide differences in finished-pack weight, usable space, dispensing behavior, and shipping requirements.
| Material | Initial selection considerations | What to confirm before approval |
| HDPE | Opaque HDPE can conceal the contents and provide a consistent visual presentation across products. | Actual opacity, bottle dimensions, label performance, closure compatibility, and product-protection performance. |
| PET | Clear PET makes the contents visible, which may support a product presentation built around the capsules or tablets themselves. | Whether the visible fill level is acceptable, how the product looks after settling, and whether the complete package provides the required protection. |
| Glass | Clear glass makes the contents visible; amber glass is an option when light protection is part of the specification. | Light transmission data, filled-pack weight, breakage risk, shipping protection, and compatibility with the proposed cap and seal liner. |
Do not use bottle color alone as proof of light protection. If the formulation is light-sensitive, ask for light transmission data for the specific bottle and have the product team determine whether the package meets the product’s requirements.
For glass, weigh a filled and capped sample and check how it fits in the shipping carton. Include the weight and cost of dividers or cushioning when comparing shipping options. After a trial shipment, inspect the bottle body, base, shoulder, and neck for chips or cracks.
If the bottle will use induction sealing, ask the liner supplier to confirm compatibility with the glass sealing surface and any surface treatment. Then trial-seal the actual bottle, cap, and liner together.
For moisture-sensitive products, review the basis of every barrier claim. Ask which bottle, cap, and liner the barrier report covers, as well as the test temperature, humidity, and units. Results from material specimens can guide initial screening, but they should not be treated as proof that a different finished package will perform identically.
Use the intended retail package, including the specified desiccant, for product stability testing. Keep material selection, package testing, and product stability approval connected rather than treating them as separate purchasing tasks.
Bottle Capacity and Trial Filling
The listed bottle capacity is a starting point, not a guarantee that a particular capsule count or powder weight will fit.
Ask the supplier whether the listed size is the nominal capacity or the overflow capacity. Overflow capacity is the volume of liquid a bottle holds when filled to the rim. Capsules and tablets do not occupy space like a liquid: their shape, orientation, settling behavior, and interaction with the bottle shoulder affect the volume they need.
The practical question is not simply whether the contents fit. It is whether they fit consistently while leaving the opening clear, allowing the cap to close correctly, and supporting controlled dispensing.
Estimate loose-fill volume
For a 60-capsule pack, count out several groups of the same size. Pour each group into a graduated cylinder using the same cylinder, pouring technique, and reading method.
Record:
- The capsule count in each measurement.
- The product batch used.
- The observed loose-fill volume.
- Whether the sample was left loose or deliberately settled.
- The range across repeated measurements.
Use that range to decide which bottle sizes to request. Avoid selecting a bottle solely because one carefully arranged sample fits inside it.
For powders, use a consistent weighing and filling method. Record the volume immediately after filling and, where relevant to your process, after a defined settling step. This helps distinguish normal product behavior from differences caused by inconsistent sample preparation.
Trial-fill the actual bottles
Use the same product batch for each candidate bottle and include the intended desiccant or scoop.
Take a side-view photo after filling and record:
- Where the top of the capsule pile or powder surface sits relative to the shoulder.
- Whether capsules bridge near the opening.
- Whether product remains on the sealing surface.
- Whether the desiccant or scoop interferes with capping.
- Whether the cap tightens fully without contacting the contents.
- Whether the filled appearance is acceptable for a clear bottle.
Compare more than one bottle of each candidate size. A single successful fill does not show how consistently the package will behave.
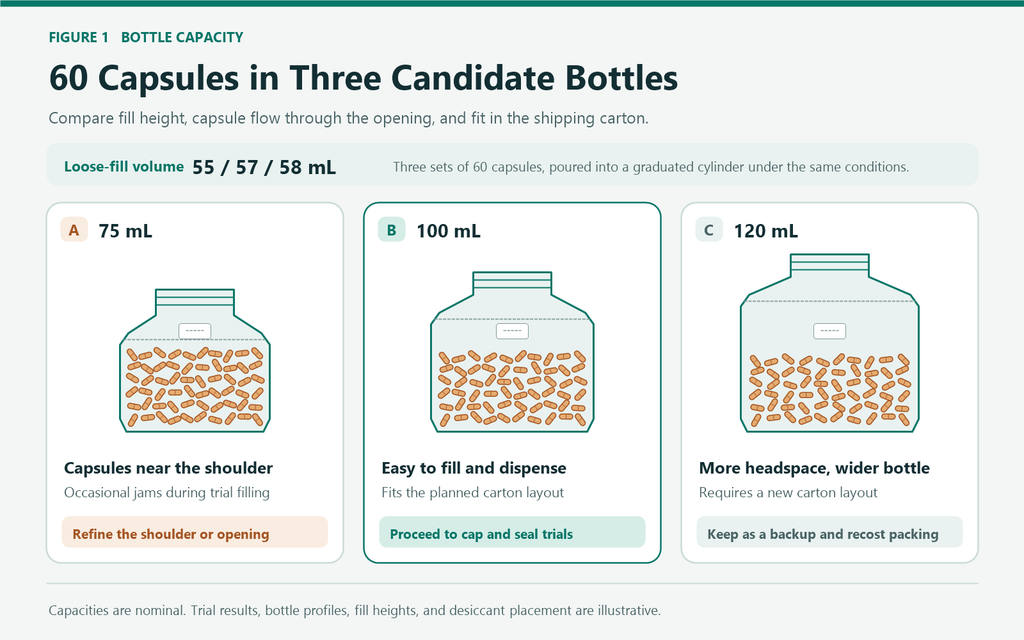
Then test dispensing from a full, half-full, and nearly empty bottle. Note whether the customer has to shake the bottle, whether several capsules come out unexpectedly, and whether the last few capsules become trapped.
For powders, check whether the scoop can reach the bottom and pass through the opening when full without excessive spilling.
Verify at the planned line speed
Run a continuous trial on the counting and filling machine using the intended bottle and production setup.
Observe the full sequence rather than only the filling point:
- Empty bottles enter and remain stable on the conveyor.
- Bottles align correctly beneath the filling chute.
- Product enters without repeated jams or excessive bounce.
- Desiccants or scoops are inserted as specified.
- Filled bottles reach the capping station without product on the rim.
- Finished bottles contain the required count or net weight.
Recount capsules in selected finished bottles and verify that any required insert is present.
Record the location of each jam. A capsule that stops in the filling chute, bridges across the bottle opening, or bounces onto the sealing surface after striking the shoulder points to a different adjustment.
That record helps the filling facility decide whether to reposition the chute, change the neck opening, adjust the operating conditions, or try a bottle with a gentler shoulder profile.
Approve bottle capacity only after the package works under the intended filling conditions—not simply after a hand-filled sample looks acceptable.
Matching the Bottle Neck to the Cap and Seal
The bottle neck, cap, and seal liner must work together. A cap that appears to fit does not establish that the combination will seal consistently, maintain acceptable opening effort, or reclose properly after the first use.
Neck Dimensions for Filling and Dispensing
Find the minimum inside diameter on the neck drawing and check clearance for the product, filling chute, or scoop. Use the minimum dimension rather than relying only on a nominal opening size.
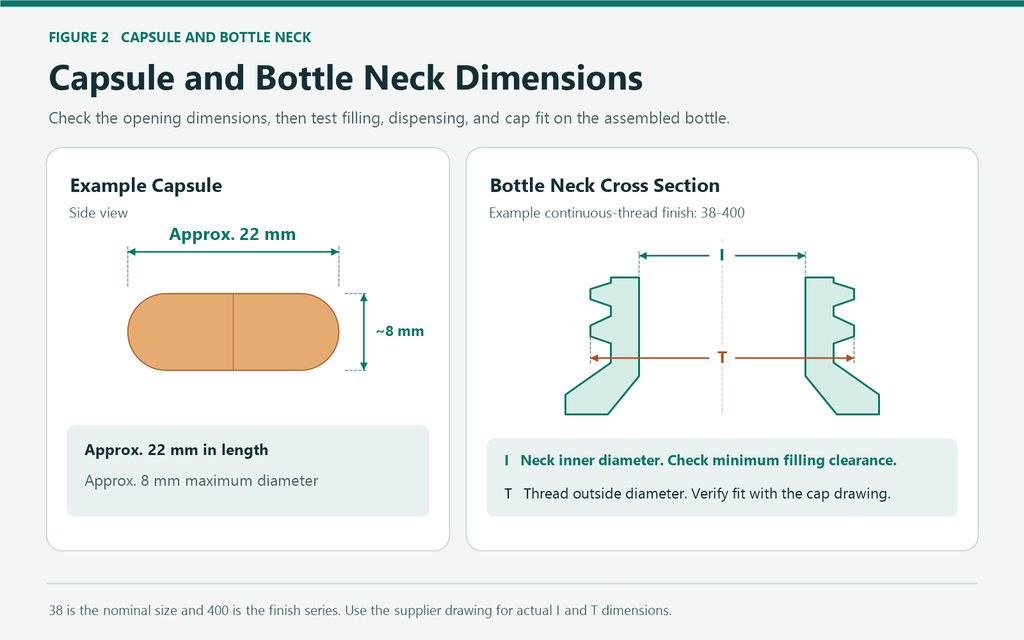
For cap fit, check:
- Thread outside diameter.
- Thread finish.
- Finish height.
- Sealing surface dimensions and condition.
- The supplier’s specified cap part number.
- Dimensional tolerances for the bottle and closure.
With the sample in hand, verify that the cap starts straight, engages smoothly, and sits square after tightening. Investigate any scraping, rocking, uneven seating, or tendency to cross-thread.
When evaluating wide-mouth bottles, reproduce the full dispensing motion. For capsules, try pouring from a full, half-full, and nearly empty bottle. Note whether too many capsules come out at once and whether the last few get caught inside.
For powders with a scoop, reach the bottom, withdraw a full scoop, and replace the cap. Use the same motions for each candidate so the results are comparable.
A wider opening should therefore be evaluated as a usability choice, not automatically treated as an improvement. The preferred neck must balance filling access with controlled dispensing.
Induction Sealing on the Production Line
When requesting quotes for induction seal liners, provide the bottle neck material, cap part number, and desired peel characteristics.
Also clarify:
- Whether the cap will arrive with the liner installed.
- Whether backing should remain in the cap after peeling.
- The expected condition of the bottle rim after opening.
- The sealing equipment and intended production speed.
- How sealing performance will be inspected and approved.
Keep the bottle, cap, and liner combination fixed during each trial. Changing several components at once makes it difficult to identify which change improved or worsened the seal.
Record application torque, sealer power, conveyor speed, and sealing head position. Proper cap application torque is an important input to consistent induction sealing; the setting should be established for the actual package rather than copied uncritically from another bottle.
Let samples cool under agreed conditions, then inspect:
- The bond around the entire rim.
- How the liner peels.
- Any residue on the sealing surface.
- Scorching, wrinkling, or other visible damage.
- The condition and position of any backing retained in the cap.
Once you have a working setup, retest across the planned line speed range and check samples after a brief stop and restart.
| What you see | What to check first |
| The liner lifts easily on one side | Check for a tilted cap, an off-center liner, debris on the sealing surface, or a bottle passing off-center under the sealing head. |
| The liner comes away easily around the entire rim | Confirm that the heat-seal layer matches the bottle material. Then check contact pressure and the combination of power and conveyor speed. |
| The liner is scorched, wrinkled, or unusually hard to peel | Check heat input, conveyor speed, and sealing head position. Confirm the expected peel behavior with the liner supplier. |
| Seal results vary between otherwise similar samples | Compare component lots, cap application, bottle positioning, rim cleanliness, and recorded equipment settings before making changes. |
These checks are troubleshooting starting points, not proof of a single root cause. Change one controlled variable at a time and document the result.
Measure removal torque after the agreed hold time and under defined sample conditions. Record it separately from the application torque used during capping so the results are not confused.
After peeling the seal, check whether the backing remains in the cap as designed and whether it shifts during repeated opening and reclosing. If moisture protection matters after first opening, include the reclosed package in the evaluation.
Define an acceptable opening experience as part of approval. A package should not pass solely because the seal is difficult to remove; the intended customer must also be able to open and use it as designed.
Label Fit and Placement on the Actual Bottle
Start supplement bottle label design with the usable panel on the bottle drawing, not with an artwork size chosen in isolation.
The available label area must accommodate both the physical label and the approved information layout. Have the relevant regulatory or quality reviewer approve the label content separately from the physical fit. U.S. dietary supplement requirements include establishing label specifications and checking that the specified label has been applied to the finished package.
Establish the usable label panel
On a round bottle, use the straight wall between the upper and lower curves to determine label height. Leave sufficient clearance so normal placement variation does not push an edge onto the shoulder or base curve.
On a square bottle, check the flat panel width and decide whether the label will stay within one panel or wrap around a corner. If it crosses a corner, inspect the actual bottle for distorted text, wrinkles, and lifting edges.
Before finalizing artwork, confirm:
- The usable label panel height.
- The label width and finished dimensions.
- The intended seam location.
- The application direction.
- The agreed vertical placement range.
- The location of the barcode and any batch or date coding area.
Calculate and verify the seam gap
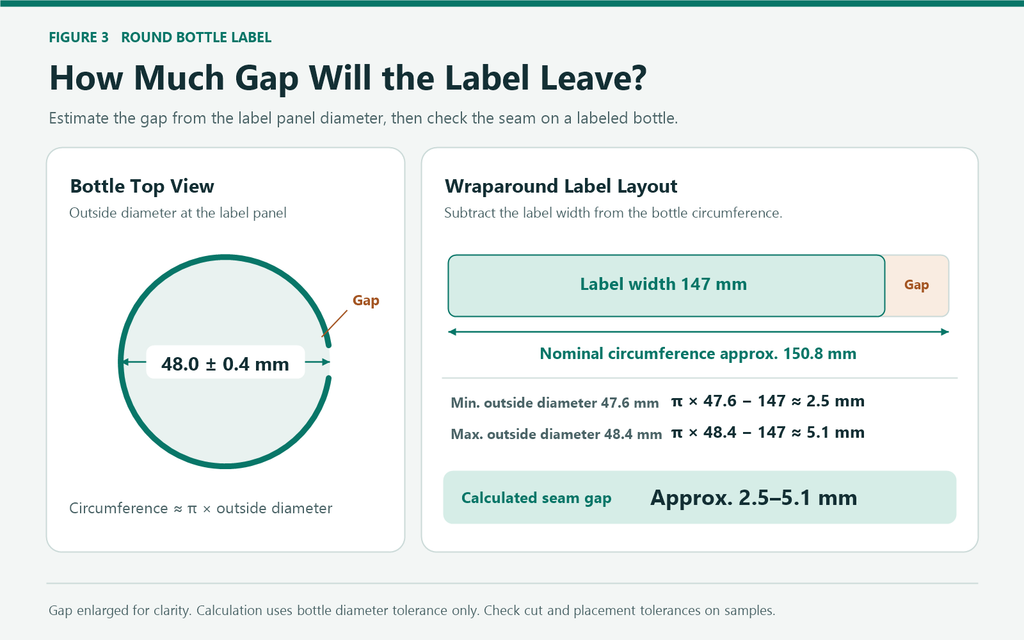
For a wraparound label, subtract the label width from the bottle circumference to estimate the seam gap.
Seam gap = Bottle circumference − Label width
A positive result indicates a gap; a negative result indicates an overlap. Use consistent measurement units.
Check both ends of the tolerance range when sampling:
- A smaller bottle paired with a wider label may produce an overlap.
- A larger bottle paired with a narrower label may leave too much of the bottle exposed.
The calculation is a planning tool. Confirm the result with actual bottles and production labels before approving the artwork dimensions.
Test the intended label stock and adhesive
Use the intended label stock and adhesive for sampling. A temporary paper mockup can help assess layout, but it cannot establish how the production label will adhere.
Record whether the bottle surface is clean and dry and note the application conditions.
Inspect the label:
- Immediately after application for skew, bubbles, and wrinkles.
- After the agreed hold time for seam or corner lifting.
- After representative handling for abrasion and edge damage.
- After the shipping trial for appearance and readability.
Keep the barcode clear of seams and sharply curved areas, allow clear space on both sides, and test scanning on the labeled bottle with the equipment you plan to use.
Finished Sample Approval
A finished sample should represent the package you intend to manufacture: actual product, approved fill quantity, intended bottle, matching cap, specified seal liner, production label, and any required insert.
During a pilot run, take samples at startup, during steady operation, and after a stop and restart. Record the bottle, cap, and seal liner lot numbers for each group, along with line speed and equipment settings.
Agree on the inspection method, sample count, and acceptance criteria before testing.
| Inspection | How to check | What to record |
| Filling | Recount sampled bottles, confirm any inserts are present, and inspect the sealing surface for trapped product. | Actual count or net weight, number of defects, and where they occurred. |
| Capping and sealing | Measure removal torque at the agreed time and inspect the bond around the rim after peeling. If small leaks need to be detected, agree on a suitable test and acceptance criteria in advance. | Torque readings, bond condition, defect photos, and line settings. |
| Dispensing and reclosing | Test dispensing at different remaining fill levels. Open and close the bottle the agreed number of times and check the threads and liner backing. | Any dispensing problems, closure fit, and backing movement. |
| Labeling | Measure label height and seam position. Check for lifting, abrasion, and barcode readability. | Label revision, measurements, scanning results, and photos of labeled bottles. |
| Shipping | Trial-ship using the intended carton, cushioning, and packing configuration. Photograph the packout when you open the carton, then inspect each bottle. | Position in the carton, bottle and cap damage, seal condition, and damage to the product. |
Separate visible quality from protection performance
A bottle can look acceptable while still requiring further investigation into sealing or product protection. Conversely, a functioning package may have cosmetic defects that make it unsuitable for retail presentation.
Define these approval categories separately:
- Appearance: bottle finish, color, label alignment, and visible damage.
- Function: filling, opening, dispensing, and reclosing.
- Integrity: seal condition and any agreed leak-test results.
- Product protection: results from the applicable stability or protection evaluation.
- Traceability: component identification, batch records, and approved revisions.
Do not treat a visually continuous seal as automatic proof of every barrier or leak-performance requirement. Use the inspection or test method appropriate to the requirement being evaluated.
Compare shipped and unshipped samples
If a cap loosens or capsules break during shipping, compare the shipped bottles with unshipped samples from the same batch to see whether the defect was already present.
Keep the comparison as consistent as possible: same product batch, component lots, filling conditions, and storage period.
Create a repeatable approval record
After approval, keep the following in one controlled record:
- Sample ID and approval date.
- Bottle, cap, seal liner, and label part numbers.
- Drawing and artwork revisions.
- Component lot numbers.
- Filling, capping, sealing, and labeling settings.
- Inspection methods and results.
- Defect photographs.
- Approved reference samples.
- Required follow-up checks when a component changes.
Use that record to identify which checks to repeat if the cap, liner, label, bottle material, or production setup changes.
For U.S. dietary supplement operations, packaging controls also include checking packaging and labels before use, examining representative finished samples, and maintaining traceability through distribution. The approval record should support these controls rather than sit apart from them.
Supplier Quotes Based on the Approved Specification
Ask each supplier to itemize the same production-ready package. A lower bottle price is not necessarily a lower finished-pack cost if the quote excludes the liner, assembly, labels, freight, or required protective packaging.
List the part number and revision for the bottle, cap, liner, and label. Specify whether the cap should ship with the liner installed, whether labels should be supplied separately or applied, and where the finished packaging components should be delivered.
Scope of the unit price
Confirm whether the quoted price covers:
- The specified bottle material, color, and dimensions.
- The approved cap.
- The specified seal liner.
- Liner installation or other assembly.
- Label printing and any label application.
- Shipping cartons, dividers, or protective packing.
- Agreed inspection documentation.
If a cap is offered with or without a preinstalled liner, verify which configuration the quoted price covers.
Ask suppliers to identify exclusions clearly.
Order quantities
Bottles, caps, liners, and labels may each have their own minimum order quantity. Custom colors, printing, or component configurations can also affect the quantity a supplier is willing to produce.
Ask for a component-by-component breakdown:
| Component | Questions to include |
| Bottle | What is the minimum order quantity for the specified material, color, and design? |
| Cap | Does the minimum apply to the cap alone or the cap-and-liner assembly? |
| Seal liner | Is the liner stocked, custom ordered, or subject to a separate minimum? |
| Label | What quantity must be printed, and how many labels will be consumed in the current batch? |
| Carton | Is protective packing included, and does custom printing create another minimum? |
If a supplier requires extra labels, separate the first-order cash outlay from the cost of the labels used in the current batch. Confirm who will store the surplus, how it will be identified, and what happens if the artwork changes before the remaining labels are used.
Also ask whether quoted quantities allow for production setup and agreed inspection samples. Resolve this before assuming that every purchased component will become a saleable finished pack.
Delivery terms
Check whether artwork setup or sampling fees recur on repeat orders, whether freight includes delivery to the filling facility, and whether the lead time starts at artwork approval or at payment.
Clarify:
- The approval milestone that starts production.
- The estimated component production time.
- Whether bottles, caps, and labels will arrive together or separately.
- The delivery location and freight responsibility.
- The process for reporting shortages or damaged components.
- Whether repeat orders will use the same approved materials and revisions.
Compare first-order cost and repeat-order cost separately. A first order may include setup charges that do not apply to later purchases.
Compare the cost of complete usable packs
For a practical purchasing comparison, calculate:
Cost per complete usable pack = Relevant packaging, setup, freight, and agreed loss costs ÷ Expected number of complete usable packs
State what is included in the calculation so all quotes use the same basis. Keep surplus inventory visible rather than hiding it in an artificially low unit price.
Once you select a quote, add its component revisions to the approved specification. Use that record to check that the bottles, caps, liners, and labels in the next delivery match the approved samples.
A purchase order should refer to the approved specification rather than rely only on a description such as “white supplement bottle with cap.”
Frequently Asked Questions
What size supplement bottle do I need for 60 capsules?
There is no single bottle size that fits every 60-capsule product. Capsule length, maximum diameter, settling behavior, and bottle geometry affect the capacity required.
Provide the capsule dimensions and an actual sample, then trial-fill the candidate bottles. Include the desiccant if you plan to use one.
Choose a bottle after confirming that:
- All 60 capsules fit consistently.
- The opening stays clear of trapped capsules.
- The cap tightens smoothly.
- Filling works at the intended line speed.
- The last few capsules are easy to dispense.
Use nominal capacity to shortlist options, not as the final approval criterion.
Which is better for my product, an HDPE bottle or a PET bottle?
If you want customers to see the contents, start by looking at clear PET bottles. If you want to conceal the contents, consider opaque HDPE bottles.
For products sensitive to moisture or light, check the protective performance of the candidate packaging. When comparing moisture barrier data, verify that the report covers the same bottle, cap, and seal liner combination you intend to buy, with clearly stated test conditions.
Also compare filling performance, label adhesion, dispensing, and finished-pack presentation before making the final selection.
Can I use a bottle and cap with the same listed size?
The same listed size is not enough to approve compatibility.
Verify the nominal size, thread finish, and sealing surface, then test the actual cap for straight engagement and smooth tightening.
If you plan to use induction sealing, confirm that the liner’s heat-seal layer is compatible with the bottle neck material. Ask for a sample of the complete combination so you can check capping, sealing, and reclosing after the seal has been peeled.
Record the approved bottle, cap, and liner part numbers so a later order does not substitute a different combination without review.
What should I check before placing a bulk order?
Prepare a finished sample using the actual product and the intended bottle, cap, liner, and label.
Check for:
- Correct fill quantity.
- Required desiccants or scoops.
- Trapped product at the opening.
- A continuous bond around the rim.
- Acceptable opening effort.
- Easy dispensing and reliable reclosing.
- Secure label edges.
- A readable barcode.
Run the package through the intended production equipment. If you primarily ship through e-commerce, send a trial shipment using the intended carton and cushioning, then inspect the bottle, cap, seal, label, and product on arrival.
Approve the bulk order against written criteria and retained reference samples, not ph
What should I include in a quote request and how do minimum order quantities work?
Include the fill quantity, bottle specification, cap, liner, label, order quantity, and delivery location in one request. If you have approved samples, include the part numbers and revisions.
Specify whether liners must be installed in caps and whether labels will be supplied separately or applied.
Minimums may apply to individual components, especially custom colors or printed labels. Ask the supplier to itemize each minimum, unit price, one-time charge, and freight cost.
Then compare the delivered cost for the same number of complete packs. Keep unused components, storage responsibilities, and first-order setup charges visible in the comparison.